Showing posts with label Linux. Show all posts

Saturday, April 4, 2015

Install Ubuntu 14.04.2 LTS

1. Using a DVD?

It’s easy to install Ubuntu from a DVD. Here’s what you need to do:
Put the Ubuntu DVD into the DVD-drive
Restart your computer. You should see a welcome screen prompting you to choose your language and giving you the option to install Ubuntu or try it from the DVD.
If you don’t get this menu, read the booting from the DVD guide for more information.

Using a USB drive?

Most newer computers can boot from USB. You should see a welcome screen prompting you to choose your language and giving you the option to install Ubuntu or try it from the CD.
If your computer doesn’t automatically do so, you might need to press the F12 key to bring up the boot menu, but be careful not to hold it down - that can cause an error message.


2. Prepare to install Ubuntu

  • We recommend you plug your computer into a power source
  • You should also make sure you have enough space on your computer to install Ubuntu
  • We advise you to select Download updates while installing and Install this third-party software now
  • You should also stay connected to the internet so you can get the latest updates while you install Ubuntu
  • If you’re not connected to the internet, we’ll help you set up wireless at the next step

3. Set up wireless

If you are not connected to the internet, you will be asked to select a wireless network, if available. We advise you to connect during the installation so we can ensure your machine is up to date. So, if you set up your wireless network at this point, it’s worth then clicking the Back button to go back to the last screen (Preparing to install Ubuntu) and ticking the box marked ’Download updates while installing’.

4. Allocate drive space

Use the checkboxes to choose whether you’d like to Install Ubuntu alongside another operating system, delete your existing operating system and replace it with Ubuntu, or — if you’re an advanced user — choose the ’Something else’ option

5. Begin the installation

Depending on your previous selections, you can now verify that you have chosen the way in which you would like to install Ubuntu. The installation process will begin when you click the Install Now button.
Ubuntu needs about 4.5 GB to install, so add a few extra GB to allow for your files.

6. Select your location

If you are connected to the internet, this should be done automatically. Check your location is correct and click ’Forward’ to proceed. If you’re unsure of your time zone, type the name of the town you’re in or click on the map and we’ll help you find it.

TIP: If you’re having problems connecting to the Internet, use the menu in the top-right-hand corner to select a network.

7. Select your preferred keyboard layout

Click on the language option you need. If you’re not sure, click the ’Detect Keyboard Layout’ button for help.

8. Select your preferred keyboard layout

Click on the language option you need. If you’re not sure, click the ’Detect Keyboard Layout’ button for help.


9. Learn more about Ubuntu while the system installs…

…or make a cup of tea!


10. That’s it.

All that’s left is to restart your computer and start enjoying Ubuntu!


From Ubuntu.com


Sunday, December 23, 2007

Clean install packages for save your hard disk

After you install new software by "sudo apt-get install .... ", packages need by software will be downloaded and archived in /var/cache/apt/archive, and those occupy space hard disk. How to clean up those?
- You can remove them with root permittion: sudo rm /var/cache/apt/archive/*.deb
- sudo apt-get autoremove

Friday, December 7, 2007

Installing LAMP on Ubuntu 7.10

Lately I’ve been using ubuntu 7.10 for all my projects/daily work.
As a web developer i should have LAMP on my machine and now i would guide you through installing it on yours.

This guide is divided into 3 steps: installing/tesing Apache, PHP and finally MySQL.

Lets start with Apache:
1. Open the terminal (we will be using it through most of my guide) from Applications > Accessories > Terminal
2. Install apache2 using apt-get by typing the following
sudo apt-get install apache2

Note that you should know the root password.
Now everything should be downloaded and installed automatically.
To start/stop apache2 write:
sudo /etc/init.d/apache2 start
sudo /etc/init.d/apache2 stop

Your www folder should be in: /var/www/

If everything is OK you should see an ordinary HTML page when you type: http://localhost in your firefox browser

Finished with Apache ? lets conquer PHP:
1. Also in terminal write:
sudo apt-get install php5 libapache2-mod-php5

or any php version you like
2. restart apache
sudo /etc/init.d/apache2 restart

This is it for PHP :D
Wanna test it ? Just create an ordinary PHP page in /var/www/ and run it.
Example:
sudo gedit /var/www/test.php

and write in it: < ?php echo "Hello World"; ?>

Now run it by typing http://localhost/test.php in firefox… You should see your ” Hello World ”

66 % is over, lets continue to installing MySQL:
1. Again and again in terminal execute:
sudo apt-get install mysql-server

2. (optional) If you are running a server you should probably bind your address by editing bind-address in /etc/mysql/my.cnf and replacing its value (127.0.0.1) by your IP address
3. set your root password (although mysql should ask you about that when installing)
mysql> SET PASSWORD FOR ‘root’@'localhost’ = PASSWORD(’xxxxxx’);

4. Try running it
mysql -uroot -pxxx

where xxx is your password.
Note: You can install PHPMyAdmin for a graphical user interface of MySQL by executing
sudo apt-get install libapache2-mod-auth-mysql php5-mysql phpmyadmin

5. restart apache for the last time
sudo /etc/init.d/apache2 restart

Congratulions your LAMP system is installed and running :D
Happy Coding

//Jo

UPDATE:
Due to the large number of people emailing about installing/running phpmyadmin.
Do the following:
sudo apt-get install phpmyadmin

The phpmyadmin configuration file will be installed in: /etc/phpmyadmin
Now you will have to edit the apache config file by typing
sudo vi /etc/apache2/apache2.conf

and include the following line:
Include /etc/phpmyadmin/apache.conf

Restart Apache
sudo /etc/init.d/apache2 restart

Another issue was making mysql run with php5
First install these packages:
sudo apt-get install php5-mysql mysql-client

then edit php.ini and add to it this line : ” extensions=mysql.so” if it isnt already there
sudo vi /etc/php5/apache2/php.ini

Restart Apache
sudo /etc/init.d/apache2 restart

Hope this helps :)

Popularity: 44%

From : http://joeabiraad.com

Tuesday, September 4, 2007

Ubuntu 7.04 (Feisty Fawn) LAMP Server Setup

Automatic LAMP (Linux, Apache, MySQL and PHP) In about 15 minutes, the time it takes to install Ubuntu Feisty Server Edition, you can have a LAMP server up and ready to go. This feature, exclusive to Ubuntu Server Edition, is available at the time of installation.


The LAMP option saves the trouble of installing and integrating each of the four separate LAMP components, a process which can take hours and requires someone who is skilled in the installation and configuration of the individual applications. You get increased security, reduced time to install, and reduced risk of misconfiguration, all of which results in a lower cost of ownership.

Ubuntu LAMP server Install the following Versions

Ubuntu Feisty Fawn 7.04
Apache 2.2.3
Mysql 5.0.38
PHP 5.2.1

First you need to download server version of Ubuntu version from here after that you create a CD and start booting with the CD Once it starts booting you should see the following screen in this you need to select second option “Install to the Hard disk Option” and press enter


Choose you language and press enter you can see we have selected english in the follwoing screen

Choose your location and press enter you can see we have have selected United Kingdom in the follwoing screen

If you want to try to have your keyboard layout detected by pressing a series of keys you need to select yes option and if you don’t want that and you want to choose from a list click no in this example we have selected no and press enter

Select Origin of keyboard and press enter

Select keyboard layout and press enter

Detecting hardware to find CD-ROM Drivers in progress

Scanning CD-ROM in Progress

Loading additional components progress bar


Configures the network with DHCP if there is a DHCP server in the network

Enter the Hostname of the system so in this example i enter here as ubuntulamp


Detecting Disks and Hardware in progress

Startingup the partitioner in progress

you have to partition your hard disk in this example i have selected use entire disk option if you want to edit manually you can choose manual and press enter


Warning message about data lost on your hard disk

Creating partitions in your harddisk

Write the changes to disk option here you need to select yes and press enter
Creating ext3 filesystem in progress

Configuring the clock option here if you want to leave UTC Select yes otherwise no and press enter

You need enter the Full name of the user you want to create for your server in this example i have created administrator user select continue and press enter


username for your account in this i have entered test select continue and press enter


Entered the password for test user select continue and press enter

Confirm the password for test user select continue and press enter

Installing the base system in progress

Configuring package mirror this will be related to your country option

Now it will start Installing software and here you need to select the server options if you want DNS or LAMP i have selected as LAMP for our LAMP server installation


Software Installation in Progress

Installing GRUB Boot loader in progress

Installation complete message here you need to remove your CD select continue and press enter it will reboot your server

After rebooting you can see the following screen prompt for username


This will complete the Ubuntu LAMP Server Installation and your server is ready for installing applications which supports apache,mysql and php.

Enable root Account in Ubuntu server (Not Recommended for security Reasons this is just Optional)

After the reboot you can login with your previously created username (test). Now we will enable the root account using the following command

sudo passwd root

and give root a password.

Now onwards we become root by running the following command

su

Configuring Static ip address in Ubuntu server

Ubuntu installer has configured our system to get its network settings via DHCP, Now we will change that to a static IP address for this you need to edit Edit /etc/network/interfaces and enter your ip address details (in this example setup I will use the IP address 172.19.0.10):

sudo vi /etc/network/interfaces

and enter the following save the file and exit

# The primary network interface

auto eth0
iface eth0 inet static
address 172.19.0.10
netmask 255.255.255.0
network 172.19.0.0
broadcast 172.19.0.255
gateway 172.19.0.1

Now you need to restart your network services using the following command

sudo /etc/init.d/networking restart

You need to setup manually DNS servers in resolv.conf file when you are not using DHCP.

sudo vi /etc/resolv.conf

You need to add look something like this

search domain.com

nameserver xxx.xxx.xxx.xxx

Install SSH Server

If you want to access your server remotely through SSH you need to install SSH server for this you need to run the following command

sudo apt-get install ssh openssh-server

You will be prompted to insert the installation CD again and this will complete SSH server in your edgy lamp server.This is really simple and easy server installation for new users and who wants a quick server.

GUI Installation for Ubuntu LAMP Server

If you are a new user and not familiar with command prompt you can install GUI for your ubuntu LAMP server for this you need to make sure you have enabled Universe and multiverse repositories in /etc/apt/sources.list file once you have enable you need to use the following command to install GUI

sudo apt-get update

sudo apt-get install ubuntu-desktop

The above command will install GNOME desktop if you want to install KDE desktop use the following command

sudo apt-get install kubuntu-desktop

Upgrade Ubuntu Server 6.10 (Edgy Eft) to 7.04 (Feisty Fawn)

Ubuntu 7.04 is the current stable version of the Ubuntu operating system. The common name given to this release from the time of its early development was “Feisty Fawn”.

Before Upgrading You need to remember the following point

Take comple backup of your server before upgrading Now you need to upgraded Ubuntu Edgy Server to Ubuntu Feisty.

You have to update the sources.list file to apt-get be able to find the update-manager-core package

sudo vi /etc/apt/sources.list

and Change every occurrence of edgy to feisty

deb http://archive.ubuntu.com/ubuntu/ edgy main restricted
to

deb http://archive.ubuntu.com/ubuntu/ feisty main restricted

Update the new lists of packages by doing

sudo apt-get update

Install update-manager-core

sudo apt-get install update-manager-core

Launch the upgrade tool

sudo do-release-upgrade

Follow the on-screen instructions

Monday, August 13, 2007

Install gPHPEdit in Ubuntu, a good PHP editor review

gPHPEdit is not the most complete editor that you will ever use and has a simple and unclutered interface which makes writing code easy. Its based on the Scintilla editor and takes it a step further than SciTE and uses Gnome 2. What it lacks in features it makes up with pure speed. It’s opened at exactly the last place you left it before you can blink your eye. The main features are:
  1. Syntax highlighting for all functions up to PHP 4.3
  2. Code assistance (function, parameter assistance PHP 4.3 only)
  3. Syntax checking
  4. Tabbed viewing
  5. Support for HTML and CSS
syntax highlighting works but if you’re like me as you can tell from the site I like to work with a black background (otherwise after a while I have very sore eyes) and after changing all the setting there still remained some portions of the code with the default white background. On searching the site this bug has been fixed and will be included for the 1.0 release or can be downloaded via cvs. Another thing working with a black background when selecting text that is white you can’t read it anymore as there is no way to change the hight lighting color.

The PHP code assistance is great and just like the application is displayed very quickly and can be adjusted. The syntax checker is manual and has to be called using the menu or F9 this can be quite annoying and it does not check any functions or parameters within the file.

The search facilities are very basic in that only one file can be searched and the searching only highlights the first occurrence at the top of the file and you must continue through each occurance within the file. This can be quite tedious for large files with many partial matches.

If you’re working on a large project with multiple folders navigation can be quite tedious although on smaller projects where all files are in a small number of folders the handy list of classes with their functions can be displayed on the left of the screen for easy navigation but beware of files that have functions only as they will be listed so a folder containing numerous files of this type can be very difficult to navigate.

Overall, this editor is quick and easy to work with but without some more advanced features it feels a bit naked, the lack of automated indentation and auto syntax checking become more and more frustrating after long term use. Quick folder navigation would be an enormous improvement and these three feature would alone push this application onto the desktop of many more developers. Despite the lack of more advanced features it isn’t a tool I would quickly uninstall. If you’re an Eclipse user for example and you want to quickly open a couple of files to view and perform small edits this is where it excels. In the time that eclipse starts you can open edit and save and be doing something else. This application is reaching version 1.0 and is showing the some good signs that with some further development and added features would be a much more useful application.

Download gPHPedit source for Ubuntu here.

Các bạn có thể xem bài dịch tiếng Việt http://binkun-linux.blogspot.com/2007/08/hng-dn-ci-gphpedit-lp-trnh-php-trong.html.

Install wxDownloadFast in Ubuntu to fastly download

wxDownload Fast (also known as wxDFast) is an open source download manager.

It is a multi-threaded download manager. This means that it can split a file into several pieces and download the pieces simultaneously.
Some features are:

Faster downloads
Download resuming
Available in multiple languages and easily translated.
Connection to HTTP/FTP servers which require a password
Calculates the MD5/SHA1 checksum of downloaded files so they can be easily verified
Firefox integration through FlashGot
and more.

You open Terminal window, then type there :
sudo apt-get install build-essential libwxgtk2.6-0 libmad0 libsndfile1 libwxgtk2.6-dev gettext
wget http://nchc.dl.sourceforge.net/sourceforge/dfast/wxdfast_0.6.0-1_ubuntu_i386.deb
sudo dpkg -i wxdfast_0.6.0-1_ubuntu_i386.deb
The first line get some necessary library.
Home page: http://dfast.sourceforge.net/
Bạn có thể xem bài dịch tiếng Việt tại đây : http://binkun-linux.blogspot.com/2007/08/install-wxdownload-fast-to-fastly.html

Wednesday, July 11, 2007

How to Install Elisa media center in Ubuntu

Fluendo’s Elisa is a free software media center application that can play your DVDs, video files, music, and pictures. Since it is designed for extensibility, Elisa has the potential to do much more. It does not handle television or video recording functions, but it is a slick and promising project.

Elisa media center Features

  • Elisa supports a wide range for media formats through the use of the GStreamer multimedia framework, including but not limited to Ogg Vorbis, Ogg Theora, Matroska, MPEG 2, MPEG4, Quicktime and Windows Media. Commercially licensed plugins that work with GStreamer and Elisa are available from Fluendo.
  • Elisa supports playing both local music files and web radio stations. So if your media center is connected to your hi-fi system you can use it as a web radio tuner or you can use it as a jukebox for your own music files.
  • Elisa supports any remote control supported by the linux infrared control project, this includes many of the most popular infrared remote controls out there.
  • Elisa can view photos and images in all the most common formats used like jpeg and png. Elisa can also do simple manipulation of the photos like rotating photos that are taken in portrait mode.
  • Elisa supports playing back DVD’s
  • Elisa is cross platform allowing you to install it on both GNU/Linux and Unix systems, but also on Windows systems.
  • Elisa supports DLNA compliant upnp multimedia devices. This means photos, music and videos shared from such devices are available in Elisa. Elisa is also able to share its own files to upnp enabled devices.
  • Elisa can act as a DAAP client so as to browse and play music files shared on the network by iTunes, Banshee or Rhythmbox
  • Elisa is also able to browse and display pictures shared on Flickr

Install Elisa media center in Ubuntu

For Ubuntu Edgy Users

You need to edit the /etc/apt/sources.list file

sudo vi /etc/apt/sources.list

add the following line save and exit the file

deb http://elisa.fluendo.com/packages edgy main

For Ubuntu Feisty Users

You need to edit the /etc/apt/sources.list file

sudo vi /etc/apt/sources.list

add the following line save and exit the file

deb http://elisa.fluendo.com/packages feisty main

Now you need to update the source list using the following comamnd

sudo apt-get update

install elisa using the following command

sudo apt-get install elisa

This will install all the packages required for elisa media center.

If you want to open go to Applications -> Sound & Video ->Elisa Media Center


Once it opens you should see the following screen


On launch, Elisa looks for the configuration file ~/.elisa/elisa.conf. If it does not find one (and it won’t the first time you run Elisa), it creates a skeleton elisa.conf file that you can then edit in any text editor.

The important options to customize are the locations in which Elisa will look for media. The default elisa.conf specifies ./sample_data/movies, ./sample_data/music, and ./sample_data/pictures — directories that do not even exist inside ~./elisa/.

Elisa Media Center plugins

If you want Elisa Media Center plugins check here

from http://www.ubuntugeek.com

Wednesday, July 4, 2007

How to install Flash Player for Ubuntu - Cách cài đặt flash cho Ubuntu

Cách tốt nhất để cài Macromedia Flash Player plug-in cho Mozilla Firefox là mở trình duyệt Firefox và mở trang Adobe.com: Version test for Adobe Flash Player. Sau đó bạn sẽ thấy một thông báo là thiếu plug-in flash. Bạn sẽ click vào thông báo nầy và theo các bước mà firefox hướng dẫn để cài đặt flash. Thường thường bạn firefox sẽ cài plugin nầy một cách tự động khi bạn click "install now".
Bạn cũng có thể cài đặt bằng cách sử dụng package manager: Vào terminal gõ lệnh
sudo apt-get install flashplugin-nonfree
Khởi động lại firefox

Nếu âm thanh của flash bị lỗi bạn sửa như sau:
Vào terminal gõ lệnh:
sudo apt-get install alsa-oss
gksudo gedit /etc/firefox/firefoxrc
Sửa FIREFOX_DSP="" thành FIREFOX_DSP="aoss"

Cách đơn giản và nhanh: Tải gói nầy về và install nó ;)
http://rivervalleytechsupport.com/files/libflashsupport_1.0~2219-1_i386.deb

Thế là bạn tha hồ vào Youtube, tải các game flash về và play nó (bằng firefox nhé ;))

Friday, June 29, 2007

How to install RAR Archiver (rar)

Open a terminal window and type in:
sudo apt-get install rar
sudo ln -fs /usr/bin/rar /usr/bin/unrar

Sunday, June 24, 2007

Ubuntu 7.10 Features Overview

Announced at the middle of April 2007, the next version of Ubuntu Linux distribution (7.10, codename Gutsy Gibbon) has already started to stir up a lot of interest among the Ubuntu fans around the world. The Ubuntu team announced today the features that Ubuntu 7.10 will bring in late October this year. Here’s a quick overview of the features you will find in Ubuntu 7.10:

Desktop

Ubuntu 7.10 will ship with the latest version of the GNOME desktop (2.20), which will be released a few weeks before the final version of Gutsy Gibbon. On the other hand, Kubuntu will ship with the latest version of the KDE desktop (3.5.7). Moreover, Kubuntu users will have the possibility of installing KDE 4.0 RC2 packages.

Ubuntu 7.10 will be the first distribution to include the newly merged Beryl and Compiz projects, which will be the default window manager on systems that will support it.

Hardware Support

The Linux kernel 2.6.22 with the usual selection of updated and additional drivers will be part of the Ubuntu 7.10 release.

Ubuntu 7.10 will include the most awaited release of Xorg, version 7.3, which brings bleeding-edge features such as:
  • better graphics hardware support;
  • hotplug monitors and input devices;
  • easier configuration;
  • hotplugging-supported drivers (no xorg.conf).
You should also expect improvements to the Restricted Driver Manager, and the "winmodem" chips will be supported out of the box (where drivers are available).

Mobile

Ubuntu 7.10 will be the first release available for hand-held devices and other
mobile/embedded form factors, through the Mobile and Embedded edition.

Server

Ubuntu 7.10 Server Edition aims to attract more and more server administrators and it will bring attractive features for small businesses and organizations. Novel's AppArmor security framework will also be available for those that want it.

Stability and Performance

Last but not least, Ubuntu 7.10 is promised to be more stable and powerful than the previous releases were. The system should work much better when the filesystem is full, allowing the user to make room and continue his work without interruption.

Moreover, Upstart 0.5 will be on board of Ubuntu 7.10 to provide flexible and reliable service supervision. Also, the boot process will "suffer" improvements and reduce start-up time.

The release schedule for Gutsy Gibbon was also made public. The development process started as expected, on June 7th, with the first Alpha release, and it will end somewhere around October 18th with the final release:
  • June 7th - Tribe CD 1 (first alpha release)
  • June 28st - Tribe CD 2 (second alpha release)
  • July 26th - Tribe CD 3 (third alpha release)
  • August 9th - Tribe CD 4 (fourth alpha release)
  • August 23rd - Tribe CD 5 (fifth alpha release)
  • September 6th - Tribe CD 6 (sixth alpha release)
  • September 27th - Beta Release
  • October 11th - Release Candidate
  • October 18th - Final Release
To know the downloading details : Ubuntu, Xubuntu, Kubuntu, Edubuntu 7.10 (Gutsy Gibbon) Tribe 1 - Free

Monday, June 11, 2007

Cài đặt IE trong Ubuntu

Có những lúc bạn cần phải chạy IE để test các trang web bạn làm cho khách hàng.....

1. Cài wine và cabextract
sudo apt-get install wine cabextract

2. Trong terminal gõ:
wget http://www.tatanka.com.br/ies4linux/downloads/ies4linux-2.0.5.tar.gz
Download xong bạn giải nén:
tar xzvf ies4linux-2.0.5.tar.gz
Vào thư mục vừa giải nén
cd ies4linux-2.0.5
Cài.
./ies4linux
Sau khi cài xong chạy thử nhe ;)
/home/username/bin/ie6
Vì tôi có username trong máy là nhakhtn nên đường dẫn là : /home/nhakhtn/bin/ie6
Chúc bạn cài thành công hihi...

Thursday, May 24, 2007

Backup and Restore Ubuntu System using Sbackup

Data can be lost in different ways some of them are because of hardware failures,you accidentally delete or overwrite a file. Some data loss occurs as a result of natural disasters and other circumstances beyond your control.

Now we will see a easy backup and restore tool called "sbackup"

SBackup is a simple backup solution intended for desktop use. It can backup any subset of files and directories. Exclusions can be defined by regular expressions. A maximum individual file size limit can be defined. Backups may be saved to any local and remote directories that are supported by gnome-vfs. There is a Gnome GUI interface for configuration and restore.

Current Stable Version : - 0.10.3

Project Home page :- http://sbackup.sourceforge.net/HomePage

Sbackup Features List

  • Backup any subset of files and directories
  • Exclude files and directories by regex expressions
  • Exclude files by type (extension)
  • Exclude files by maximum file size
  • Backup to local filesystem
  • Backup to any Gnome-VFS supported remote filesystem (including sftp and ftp)
  • Full and incremental backups
  • Scheduling backups via cron
  • Gnome GUI for configuration
  • Gnome GUI for restore
  • Command-line restore tool that also provides a Python API for restoring a file or directory
  • Backing up package list in Debian derived distributions
  • On restore, existing files are not overwritten, but are renamed to a safe name

Installing sbackup in ubuntu

sudo apt-get install sbackup

Backup Your Data Using Sbackup

Once you completed the installation you can access sbackup using System--->Administration--->Simple Backup Config you can see this in the following screen

Next screen is asking for root password enter password and click ok

Once it opens the sbackup application you can see the following screen where you can configure your backup settings first tab is general options in this example i am choosing "Use custom backup settings"

Sbackup can be operated in 3 different modes

Recommended Backup

If you are new Ubuntu user or aren't sure what you should backup.This will perform a daily backup of your /home,system data held in /etc,/usr/local and /var.This will deliberately exclude any files over 100MB.By default this backup will be stored /var/backup

Custom Backup

This is same as the recommended backup and in this you can change the settings include,exclude files,you can change the schedule time.

Manual Backup

If you want to backup some files from time to time this option is for you and you can click backup now button to manually perform a backup according to the settings on the other backup properties dialog box tabs.

Next you click on "Include" tab here you can include any file or directory you want to backup

If you click on "Add file" button you should see the following screen where you can select your files

If you click on "Add Directory" button you should see the following screen where you can select your Directory for backup

Next option is "Exclude" here you can exclude files and folders you don't want to backup.Here you can exclude Paths,File Types,Regular Expressions,Max file,folder size

Next option is "Destination" here i am leaving the default location i.e /var/backup if you want to chnage the backup store location you can select the "Use Custom local Backup directory" and enter the location

Now you can select "Time" option here you can schedule when do you want to run your backup.

Available options for backups you can see in the following screen you can select hourly,daily,weekly,monthly,custom options

Next option is "Purging" here you can select old and incomplete backups and you set the no.of days you want to purge after completing all the settings you need to click on "Save" button to save your settings.

Now if you want to take backup just click on "Backup Now" or leave the schedule backup in this example i just clicked on "Backup Now" this is started a background process with process id you can see this in the following screen

Restore Your Data Using Sbackup

If you want to restore backups or any files,folders go to System--->Administration--->Simple Backup Restore you can see this in the following screen

Once it opens you should see the following screen here you can select the restore source folder and available backups from drop-down menu here you can choose files and folders you want to restore and click on "Restore" button

In this example i have choosen to restore one .iso file and once you select your file and click on "Restore" it will ask for your confirmation click on yes this will restore the file in orginal location if you want to restore in different location you need to select "Restore As" option

Note:- By default Restored Files and Directories are owned by root this is because of sbackup will runs with root.You need to chnage these files or folder permissions using chmod or just right click and select properties of the file or folder.

Backup Destination on Remote machine

One more beauty about sbackup is you can store your backup on a remotemachine for this it will give the option of using SSH or FTP for this go to System---> Administration---> Simple Backup Config once it opens the application you need to click on destination tab here you can select "Use a remote Directory" option type ssh:// or ftp:// followed by the username:password, then @, then the remote host to connect to and the remote directory.

Final Tip:-

Sbackup doesn't create a new backup file each time it runs and it creates an incremental backup.Which means that it updates the last backup with files that you changed or been created any files that haven't been updated since the last backup are unchanged

Sbackup Configuration from command line

If you want to configure sbackup you need to Edit /etc/sbackup.conf file

Restore Backup from command line

Run "sudo srestore.py /var/backup/2006-11-18_03 /home/myuser /home/myuser/old". You can omit the last parameter to restore to the same directory.

Conclusion

Sbackup is really very useful for new users particularly to allows users to choose either a simple backup scheme that performs incremental backups daily and full backups weekly, or to modify the default scheme with their own settings. Users list directories to backup in the Include tab, and select items to exclude in the Exclude tab. Exclusions can be based on directory,file type (sbackup excludes multimedia files by default), file size,or regular expression.This .

Wednesday, May 23, 2007

Install media on Ubuntu.

Fist of all you must install the codes

How to install Multimedia Codecs

sudo aptitude install ubuntu-restricted-extras libxine-extracodecs gstreamer0.10-plugins-base gstreamer0.10-plugins-good gstreamer0.10-plugins-bad gstreamer0.10-pitfdll
sudo aptitude install w32codecs

And after that you can install the tools for play media.

1. How to install DVD playback capability
sudo aptitude install libdvdread3
sudo /usr/share/doc/libdvdread3/install-css.sh
sudo aptitude install totem-xine
sudo aptitude install libdvdcss2

2. How to install MIDI sound server (Timidity++)
sudo aptitude install timidity
sudo gedit /etc/default/timidity
Uncomment the following line (remove the "#" sign)
#TIM_ALSASEQ=true
sudo gedit /etc/modules
Add the following modules to the end of the file
snd-seq-device
snd-seq-midi
snd-seq-oss
snd-seq-midi-event

3. How to install Multimedia Player (xine-ui)
sudo aptitude install xine-ui libxine-extracodecs

4. How to install Multimedia Player (MPlayer)
sudo aptitude install mplayer libxine-extracodecs
sudo aptitude install kmplayer
sudo aptitude install mozilla-mplayer

5. How to install Multimedia Player (VLC)
sudo aptitude install vlc vlc-plugin-*
sudo aptitude install avahi-daemon
sudo aptitude install avahi-utils
sudo aptitude install mozilla-plugin-vlc

6. How to install Multimedia Player (XMMS) : this is the good choice
sudo aptitude install xmms xmms-skins xmms-wma

7. How to install Multimedia Player (amaroK) : this is another good choice
sudo aptitude install amarok

After you install complete u can: Applications -> Sound & Video -> the program u like
References from http://ubuntuguide.org/wiki/Ubuntu:Feisty#Multimedia_Players_.26_Browser_Plug-ins

Monday, May 21, 2007

Basic Commands on Linux

ls (Listing)
This command will show you the contents of a directory.
ls --> will show you the contents of the current directory.
ls /dir/name --> will show you the contents of a specified directory.
ls -l --> will show you a long listing containing ownership, permissions, time last modified, and size.
ls -a --> will show you all of the files in the directory, including . (dot , the current directory)
ls -al --> What do you think?
Note that . stands for the current directory and .. refers to the parent directory

cd (Change Directory)
This command will change your current working directory.
cd --> If you just type in cd, then you will be sent to your home directory. For example, /home/mlevan/
cd /dir/name --> This command will send you directly into the desired directory.
cd /var/log/ --> This will send us to the /var/log directory.
What about these commands :
cd .
cd ..

cp (CoPy)
cp filename1 filename2 this command will copy the first file into the second file
cp Amy.txt Garret.txt
Note that if Garret.txt is already a file, then it will be overwritten !! Be careful with this command.
cp -i Amy.txt Garret.txt
If Garret.txt exists, then this command will inquire if you want to overwrite the file.
If Garret.txt does not exist, then you will not be asked.
Note that you can also add directory names to this:
cp /home/mlevan/Amy.txt /home/guest/Garret.txt
You can also copy files to a directory :
cp file1 file2 fileN directory_name
cp Amy.txt Garret.txt temp/
Note that ~ can also represent your home directory. For example, say I want to copy a file from /home/guest1/booty to the temp directory in my account:
cp /home/guest1/booty/blah.txt ~/temp/

rm (ReMove)
The rm command will remove a file.
rm filename
If you type in rm -i filename , then you will be asked if you really want to remove the file.
It is virtually impossible to regain a file after it has been removed in this fashion.

mv (MoVe)
This is the "rename" command used in DOS.
This command moves one filename into another filename.
mv filename1 filename2
The above command automatically writes over filename2 with whatever was in filename1
mv -i filename1 filename2
The above command will inquire if you really want to move the file.
You can also move directories with this command,
mv dir_name1 dir_name2

touch
This command will create a file.
touch filename
If the file already exists, then touch will update the timestamp of the file.

mkdir (MaKe DIRectory)
This command will create a directory in your current working directory:
mkdir dir_name
You can create a directory anywhere using the full pathname... if you have permission:
mkdir /var/log/class

rmdir (ReMove DIRectory)
This command will remove an empty directory.
rmdir temp
If the directory is not empty, then pass the parameters r (recursive) and f (force) to the rm command.
The f parameter will force the removal, never inquiring if you want to remove any subsequent files or directories.
The r parameter will remove travel down any directories within the directory and remove all the files.
rm -rf dir_name
cat
This command will print out a text file.
cat filename
What happens if we pass two files to this command?
cat filename1 filename2
What happens if we don't pass any files to this command?
cat

Control-D or Control-C ?
Control-C terminates a program.
Control-D stops the current input. (Admittedly, this can also end a program)

The end.
(source: bootThe Joy of Penguins - thanks a lots)

Wednesday, May 16, 2007

Guide to install Ubuntu 7.04

This is the complete guide ;)
Step 1: start computer and enter CMOS of your computer, set first boot is CD-ROM. insert Ubuntu install disk to you CD-ROM and exit CMOS setup.
the computer will start with ubuntu live cd so u can use the Ubuntu operating system without install it ;).
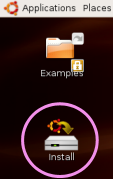
Step 2: when you are using Ubuntu live. you will see the icon "Install Ubuntu for your computer" click to it and start to install Ubuntu.


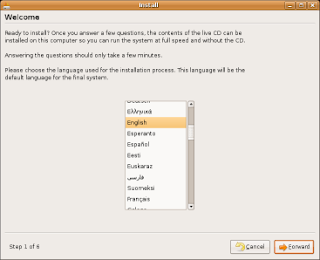
Select your language and click Forward to continue


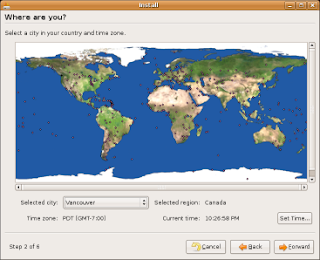
Select your location/Time Zone and make sure that the time is set correctly. Click Forward when all the settings are correct.

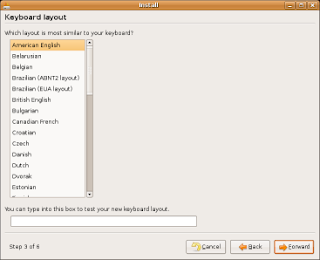
Select American English (a future tutorial will help you customize your Apple keyboard in Ubuntu) and then click Forward


  1. Enter the required information in each field. Remember that both the user name and password are case sensitive - so “username” and “Username” are not the same. Click Forward to continue.
  2. Select Erase entire disk: IDE1 master (hda) - size Virtual HDD (0) and then click Forward. Again, don’t worry, this is not deleting anything on your hard drive. It’s using up the space you assigned to Ubuntu when you set up Parallels.

  3. Review everything on the last screen. If you need to make changes, use the Back button. When you’re ready to install, click Install.


  4. Grab a cup of coffee. This doesn’t take too long, but it’s not fascinating enough to watch that attentively.

  5. When the installation has completed, you’ll be prompted to either restart or continue using the live CD. Because we need to completely power off Ubuntu (rather than restart), select Continue using the live CD.
  6. Now shut down Ubuntu


  1. If Ubuntu doesn’t completely “turn off”, use the Power Off button in Parallels.
  2. Ubuntu in Parallels for OS X

  3. Click Yes if prompted

  4. Now that Ubuntu is installed, you’ll want to change the CD/DVD-ROM setting to no longer point to the .iso file. In Parallels, select CD/DVD-ROM 1. Choose Use CD/DVD-ROM from the Emulation window and click OK. The next time you start Ubuntu, you’ll have full use of your CD or DVD-ROM.

Internet Troubleshooting

Ubuntu is very good at automatically detecting your Internet connection from OS X, whether it’s via Airport (wireless) or Ethernet (wired). If by chance you’re not online, check the following settings.

  1. Click System and scroll down to Administration. From the Administration down-down menu, select Networking.

  2. Enter your password


  3. Make sure that Ethernet connection is active. Also, make sure eth0 is selected from the Default gateway device: pull-down menu.

  4. Try surfing the Internet now and see if that’s all it took to fix the problem. If not, open a Terminal by selecting Applications, then Utilities and finally Terminal. Type the command ifconfig and then hit enter. In the eth0 section, look for an inet addr:. It will likely be something similar to 192.168.0.101. Whatever it is, write down the number.


  5. Open the Network utility again, highlight the Ethernet entry and then select the DNS tab. Click Add from the DNS Servers section. Then enter the first 3 (three) ’sets’ of numbers, and replace the last set with a 1 (one). For example, if the number you wrote down was 192.168.0.101, enter 192.168.0.1

    Hit Enter on your keyboard to save the DNS server, and then click OK.


  6. Once again, try to surf the Internet. If you’re still not connected, try looking for help at the Ubuntu community. Or, leave a message below and I’ll see if I can help. Because you’re using Parallels, you can return to OS X and research the problem there, without having to reboot over and over again.
Source : http://www.simplehelp.net/ Thanks very much ;)